Showing posts with label Weddings and Celebrations. Show all posts

Tuesday, October 29, 2013

1000 Paper Origami Cranes (or at least 325)

I'm sharing the last of my wedding project posts throughout the month of October in celebration of our one year wedding anniversary! For more wedding related projects check out our Wedding Fun tab.


Tom and I both have a varied ethnic background, and we wanted to try to incorporate little bits of our heritages in our wedding.  From our Italian rehearsal dinner followed with Norwegian dessert cookies, to the Irish soda bread being served on Sunday morning, we tried to add additional meaning to the food we chose to serve our guests.  But I think the most obvious nod we gave to either of our ethnicity's was the paper crane display in our cocktail tent.  And I've got the thumb calluses to prove it!


There are various interpretations of the significance of folding paper origami cranes in the Japanese culture, but they mostly come down to wishing good luck or happiness to either the person that folds the cranes, or the person that receives the cranes.  These traditions have crept into American culture, and seeing paper cranes at weddings has become someone commonplace (or at least in the wedding blogoshpere).  

I decided when we got engaged I wanted to try to fold as many cranes to hang from the ceiling of our cocktail tent at our wedding as I could.   To be perfectly honest, I knew I would never get to 1,000, but I figured it was the thought that counted and it would also be a great way to inject color and whimsy into an otherwise plain tent.  I looked up a few methods online, and got to folding.  Since you need a square shape, I decided to go with 12 x 12 scrapbook paper in various shades of yellow, gray and teal instead of having to trim 8 x 11 construction paper.  I also occasionally picked up wrapping paper that matched our color scheme and cut out my own squares.  At the end of the year of folding, I ended up with 3 full garbage bags of cranes, which came out to be about 325 cranes.


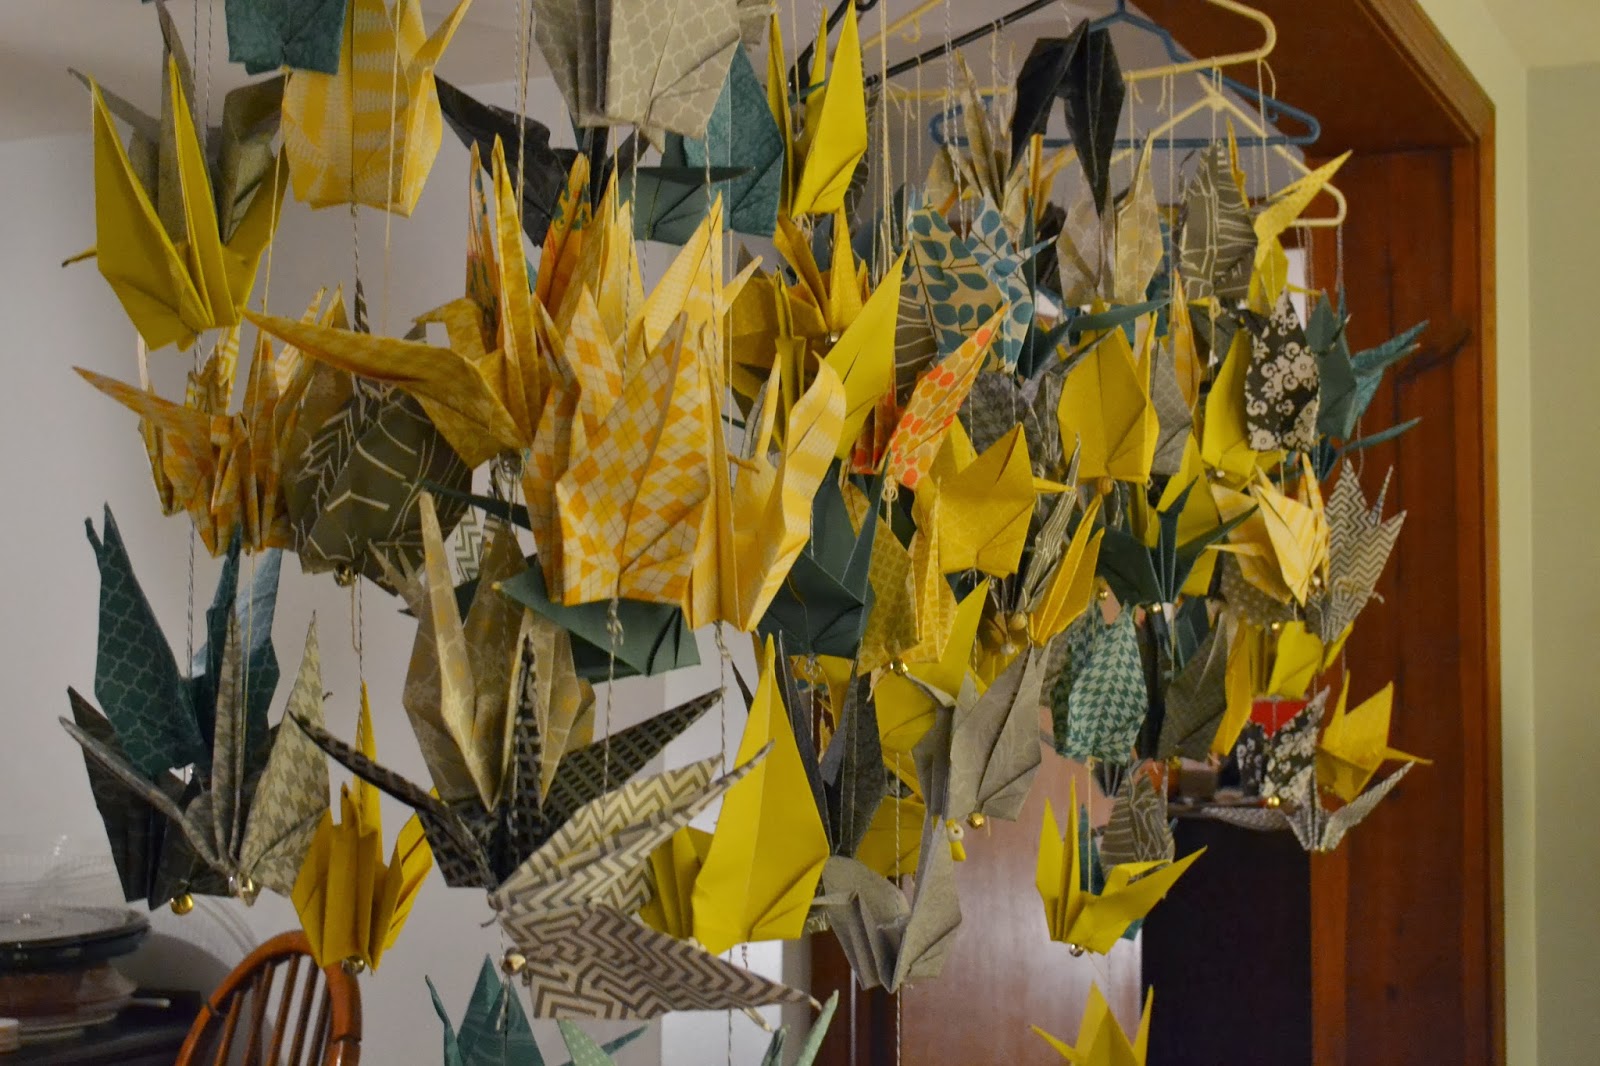
My MOH and SIL-to-be spent and afternoon using large sewing needles to string up 2 - 4 cranes to bakers twine and affixed them to hangers to keep them in order.  Then once the tent guys had the cocktail tent up, they helped me string them up on one long piece of heavy fishing line.  


Lots of people took a few home after the wedding which was nice to see. They were certainly a labor of love, but I think they brought a big impact to an easily forgotten area of the wedding. 

I love this shot at night with the tents all lit up...


Monday, October 28, 2013

Seating Charts and Place Cards!

I'm sharing the last of my wedding project posts throughout the month of October in celebration of our one year wedding anniversary! For more wedding related projects check out our Wedding Fun tab.


When you are planning your wedding, you picture the last few weeks to be filled with bridal party brunches and afternoons at the spa and manicures with your friends and those last five pounds that you wanted to lose just magically melt away while you sip on champagne at your final dress fitting.

And then reality sets in. You've got two weeks left, people keep changing their RSVPs, which is making it impossible for you to plan your seating chart, or finalize your bill with the rental company and catering company, and the weather channel is predicting rain on the day of your outdoor ceremony and cocktail hour. Oh and just four days before the wedding, an unseasonably early frost kills every flowering plant in your parents yard that was planted specifically to bloom at the wedding (by the way, asking for pity when you are buying every last flowering plant at Lowes can get you a decent discount in the gardening section!). Everything you carefully planned in the past months is basically getting thrown out the window and you find yourself coming up with Plan B and Plan C and Plan D.

All of that would stress out many a bride. It definitely stressed me out (and may have actually help me lose those last few pounds that week).  But luckily we all got through it together, but not without some creative thinking and lots of flexibility.

When Tom and I first discussed our vision for our wedding, we were both pretty set on the idea of just a few long banquet tables - we wanted our guests to feel like they were sitting at a giant dining room table, a community table, passing around plates of food and enjoying one another's company. I knew I wanted to assign specific seating at our large tables (25 - 30 people per table).

Since a lot a people had to change their RSVPs for various reasons, we had to play around with the seating a lot to try to keep family with family, friends with friends, etc. I ended up buying a set of menu stamps from Papersource and some antiqued tags from Etsy.  We stamped everyone's meal onto one side and hand wrote their name and spot to leave their table number on other.


Then I hung up pieces of paper in the layout of our reception tent and loosely taped the name tags up, making it easy to switch them around.  


We tied the name tags to our favors that would be left at each place setting (little bags of wildflower seeds with a little poem we made up and had printed by another Etsy seller) and added the final table numbers a few days before the wedding when we were confident enough that it wouldn't change again.  Then we bagged up the favors by table and left them with the decorations that would be put out by the caterers the day of the wedding.


Since we had such big tables, I also thought it would be easiest if people knew which table to head to when they entered the main tent. One of my bridesmaids' parents let us borrow an old glass panel door and using a white paint pen, my MOH painstakingly wrote each guests name on the glass.  We stapled some burlap to the back to have some contrast to make reading the names easier, and also just because we had a TON of leftover burlap available.


It came out great and we actually got quite a few complements on the door idea. I'm sure every person that hosts a party feels this way, but it was so nice for people to notice the little details that we spent so much time on.  It made the stress of the past months all melt away...(as did the copious amounts of alcohol).

And just for fun...a few shots of the guys from Big Top Tent Rental building the floor and putting the reception tent up.  I had initially planned on trying to set the camera to take photos throughout the process to create a little stop motion video to show at the rehearsal dinner, but again, when you end up spending a few days cutting out dead plants and replanting so the whole yard doesn't look dead, those other things you planned on get pushed to the wayside.


Just a few wedding posts left folks...do I know how to stretch out the fun or what??

Thursday, October 17, 2013

Super Simple Bachelorette Survival Kits

I'm sharing the last of my wedding project posts throughout the month of October in celebration of our upcoming one year wedding anniversary! For more wedding related projects check out our Wedding Fun tab.


Being the micro-manager that I am, I kinda took the reins on planning my bachelorette party. Who is surprised by that last sentence?  I really wanted to thank my girls for being such great friends so I figured if I removed the planning they wouldn't have to worry about it. I ended up renting a house in upstate New York and we stayed there for a long weekend last August.  Don't let that NSFWish poster in the picture below fool  you - I was not out to celebrate the end of my single-dom. The goal was to have some serious quality girl time, maybe go out on the lake, definitely get into some mischief and laugh a lot.

It was a perfect weekend for so many reasons, and I have to thank each of my friends that were there for making it so special.  I knew I wanted to give them a few little mementos to remember the weekend by, and to help them get through the baboonery that was sure to ensue!

One of my requests was to have a "neon night" where we all dressed up in bright neon clothing (I'm sure you've seen a gaggle of girls all in black for many bachelorettes, I basically wanted the opposite). Thankfully neon was super trendy last summer so it was really easy for everyone to comply!


I picked up some neon sunglasses down on Canal Street (I think I haggled them down to $5 a pop) and some bright and colorful makeup bags for $3 a piece at H&M.  I stuffed them with the essentials: Advil, gum, throat drops, perfumed soaps, and of course, glow stick necklaces to complete the look!


The sunglasses came in great a few months later too :-)

Tuesday, October 8, 2013

How to Make a Custom Bean Bag Toss Game

I can hardly believe this time a year ago I was just days away from from getting married!  To celebrate I'm going to be posting the rest of the wedding-project related posts that have been sitting in draft form through out the month of October.  For more wedding projects check out my Wedding Fun tab...

Here is my super serious 'how to make your own cornhole/bean bag toss game' tutorial. (<---sarcasm font.)

First, go to a Dave Matthews Concert at Citifield in 2010 with a bunch of your friends and have a FANTASTIC time.


This was our amazing half tent that we pre-gamed under.  It was windy so it was easier to hold down at half staff. I was going to post more pictures, but realized they were slightly inappropriate - let's just say I won a LOT of beer pong games that day.  If you look closely, you'll see the cornhole game on the right side of the picture.

Have one of your friends bring their own cornhole set (also known as bean bag toss) and have him leave it in your trunk for three years (Thanks Chris!).


Decide you want to make your own cornhole game for guests to play at your wedding several years before said wedding.  Bookmark (pre-pinterest!) some really good tutorials on how to make them from scratch like this one and this one.

Have all sorts of grand ideas about making this from scratch.  Fast forward to one month before your wedding, and realize you don't have the time to make it yourself, and recall that you still have your friend's game in the trunk of your car. Insert maniacal laugh here.


Start by giving a quick sanding and wipe down to the front of the boards. I used a spray primer and still had to give these guys about three light coats before I was able to fully cover the old markings. I was also feeling a little impatient, and the day was a little humid, which may have contributed to my not so stellar coating of spray paint.


Try your hand at your new silhouette cameo and adhesive vinyl. Ditch the vinyl when it keeps ripping on you, and create stencils for hand painting.

Rejected...Here comes another layer of spray paint since the vinyl
ripped the paint off!

Empty Silhouette boxes are also a great place to rest your work while you paint. 

Once the paint is dry, give it one last coat of spray sealant to make it smooth for the bean bags to slide off of it. Enlist a friend to cover the bean bags with extra fabric from some other projects from the wedding like this.

The other side said "Mr." and had a top hat!

Set up at the wedding and enjoy!  

Wednesday, October 2, 2013

Wedding Shoes to DYE For!

I can hardly believe this time a year ago I was just days away from from getting married!  To celebrate I'm going to be posting the rest of the wedding-project related posts that have been sitting in draft form through out the month of October.  For more wedding projects check out my Wedding Fun tab...


There are all sorts of options out there for wedding shoes, from very cheap to very expensive.  I knew I wanted a colorful wedding shoe - something in the golden yellow to mustard yellow range, but was having a really hard time finding the right color, or the right size, or the right price.  I was all ready to splurge on this pair of Badgley Mischkas, but could not find them in my size anywhere on the internet...


After a few other purchases and returns, I decided to look into getting a pair of dyeable shoes (the 90's are so in right now!) but once again, I wasn't crazy about the colors that were available.

After some googling, I decided to attempt to dye an old pair of champagne colored satin heels that I had worn to one of my best friends wedding a few years prior (I think they were from David's Bridal). Dyeing a pair of old shoes seemed like a win-win situation.  If it didn't work, I wasn't particularly attached to the shoes and wouldn't mind throwing them out. If it did work, I would have inexpensive shoes since dye is cheap and I already owned the shoes, that, once again I wouldn't mind ruining at my backyard tented wedding.


My basic supplies were: old satin shoes (that should soak up the dye well) painters tape (to tape the areas I didn't want to dye), RIT dye in golden yellow, iDye color remover, a sponge, and an old pot that you don't intend to use on food ever again (actually I bought a new cheapo pot that I wouldn't mind ruining), and some paper towels and cardboard to protect your work space.


I started with the color remover since my shoes were originally champagne colored.  The instructions mentioned that the color remover wouldn't work in all circumstances, and that happened to me. Figures.


Next up was the actual dyeing process.  I spent about 30 minutes dipping a corner of my sponge into the dye that was on an extremely low simmer. By the way - I highly suggest you throw that pot out afterwards, folks! That pot is never getting clean, and will never be safe to cook with again - look at how crusty and gross it was after (I said look at the dirty pot, not my dirty stove).


I gently dabbed the satin, going around in circles and making sure I was getting a pretty even coating.  Since my shoes had pretty see-through sequins, I made sure to really soak the areas underneath them.


They gradually darkened, and to be honest. while they were wet it was really hard to tell if the whole project was a total bust or not.  It wasn't until they were dry (about a full day later) that I knew it had worked!


Gratuitous shot of the invitation, blusher, doily tissue, jewelry and shoes!


I didn't seal them in any way, but I did dye them about two months before the wedding so I was pretty confident they were cured. I am happy to report that the color didn't get on my wedding dress or onto my skin the night of the wedding. Mud however, mud was another story.

The weather on our wedding day was absolutely perfect - low 70's in late October in upstate New York is pretty unheard of.  But it did POUR the day before and parts of the yard were a little wet.  This is the only shot of me in my shoes, but you can kind of see the bottom of my dress and my shoes were pretty caked in mud. So happy I hadn't spend hundreds on the expensive pair I had wanted!


Ahh that day was perfect.  I'm tearing up just looking at these photos again! Happy, happy day.

Monday, April 22, 2013

A Recycled Wedding Part 2 {This is where you buy stuff from me}

All of these items are listed on RuffledBlog - check out my listings if you are interested and would like to purchase safely via PayPal or email me!
Cat Photo Bomber Not Included.
Ok friends, you've all heard about how much I loved planning my wedding. Part of how we saved money was by crafting the decor ourselves, purchasing wholesale instead of renting, or by purchasing second-hand items.  Now, I'd like to pass along my decor to another bride so she can keep her costs down (and also keep Tom from divorcing me by finally getting rid of this stuff!).  I'll be posting all of these items on RuffledBlog.com's  "Recycle Your Wedding" tab in about a week but I wanted to give you guys first dibs!  Without further ado:


Fine Birdcage Blusher Veil - Sara Gabriel's Edie Veil - worn for all of 1 hour - $50


17 Burlap and Gray Rosette Runners - Approximately 120" x 9" - Perfectly imperfect and 
28 White linen runners 120" x 14" by  - purchased wholesale - $150 for all runners


14 Hand painted Gray and Gold Leaf Book Planters with Stringed Book Pages-  I have extra materials to make 4 additional books (with or without planter hole)) at your request.  These can easily be flipped over if you decide not to use the cut sides - selling $150 for 14, $175 for 18


Six  Four antique white medium lanterns (10" tall) with candles (purchased second hand, but I never used them) $7 each or $25 for all 4.  and 3 large antique white (15") and 3 large antique blue lanterns (15") (purchased new, never used) - selling all 12 for $150


25 Handmade Moss Cans with chicken wire - (I just realized I never showed you guys how 
these came out at the wedding!! Here ya go - perfect with a big hydrangea) - $100


108 Clear, 48 Turquoise, 24 Amber votives - some used/most new 
36 smaller turquoise votives with tealights 
Not shown - 60 oil burning candles that fit perfectly in the votives - 10 hours of burn time 
Not shown - 96 small candles that fit perfectly in the votives - 10 hours of burn time 

$100 for all candles/votives/oil burners - available for pick up only!!

Not shown - probably almost 200 50 old books - see this link - these are going for FREE and are for pick up only.  I have all sorts of sizes and shapes, and a ton of small red books (would look super cute stacked up on a dessert table or gift table).  I used 2- 3 of them under each cardboard book as my centerpieces.  They have screw holes in them because they were screwed together as part of a window display.  They would also be great for all sorts of DIY project (book lamp anyone?)

***********

Given the bulk of these items, shipping fees may be expensive and are NOT included in the prices above.  All items are definitely available for pick up in Brooklyn, and depending on the item, I may be willing to meet in Manhattan or Albany for a drop off. I'll be posting all of these items on Ruffledblog - so if you or someone you know are interested please feel free to leave me a comment here or on my Kilo Bravo Inspired Facebook Page, or email me at kayla.a.waters@gmail.com.

All of these items are being sold for literally a FRACTION of the cost (and trust me when I say I spent months on the handmade items).  I would be happy to NEGOTIATE the prices!!  I hope someone enjoys these items as much as we did!