Showing posts with label Linky Party Fun. Show all posts

Thursday, May 12, 2016

ORC: The Big Boy Room - The Reveal! {Week 6}

You might be asking yourself "Wait, what happened to Week 5's post?"

And if you've been following along on this challenge (or noticed my instagram feed to the right), you might have also guessed this happened:


Yup, Theodore Raiden decided to join us on May 1st, when I was just a day short of 36 weeks. Good thing we transitioned William into his big boy bed literally a week before, when the wallpaper was up, but the finishing touches were not quite there. Lots of big changes in a very short time period for this little big brother, but I am happy to report he has taken it all in stride.  I'm really regretting not doing a baby birthday pool sooner.

But enough about babies, onto the big boy room!


Yes, that is a pillow with a picture of Tom and I getting ready to sky dive. Seems fitting in the room.


William really digs his airplane bed. We picked it out without any input from him, so we are glad he likes it. He did fall/roll out of it pretty much every night for the first week, but since then he has been staying in it at night.  Luckily, we found a really plush shag rug (my nod to the original decor) that softens the fall, so we didn't even know he was falling out until we would check the monitor and realize we couldn't see him.  I've slowly been taking the extra pillows that were stacked around the bed away as he seems more and more comfortable.  His instinct is to go straight to the corner when we say its time to get into bed, which is why there are still a few blankets and pillows to the left, but he eventually crawls into bed as we sing songs or read.

I especially like the toy box on the front of the bed. We added two hinges so the top doesn't have to come all the way off. There isn't room for much else in here, so it's nice to have a place to toss the handful of toys that get dragged up here in the course of the day.  We are still lacking in book storage - I'm on the search for a small magazine rack or basket.

The rocket canopy was not my idea. (Something like this was actually my original idea for the corner, but, you know, time and energy.) I still think the store bought version is a little too big for the room, but, I was outnumbered by Dad and William 2:1 (I should get use to this feeling I guess). We hung it from a stud, so its a few inches farther from the corner than I would have liked in an effort to minimize how huge it looks, but it is damn cute, and best of all, *hopefully* safe in case a kid decides to try to climb it or something.

We weren't planning on bringing the glider from the nursery into this room.  And it wasn't in here the first week. However, while we were in the hospital, the grandparents were really having trouble getting William to bed, and suggested we move it back in.  Sitting in this glider and reading before bed is a huge part of his bedtime routine, and it seemed like there were enough changes going on and we could concede on this small aspect to make his bedtime smoother.  It has already made a world of difference. The baby is in the crib in our room for the next 8 - 10 weeks or so, so nothing is in the nursery right now.  Hopefully we will be able to move it back when Theodore gets transitioned into his room.


I'm still looking for just the right diaper organizers for the closet.  The pocket hanger we bought from Amazon is a touch too small.  We have made good use out of a few simple hooks for clothes, hats, and the wet diaper bag for now though.  The clip on light has really helped with making diaper changes more efficient as well. It helps when you can see what you are trying to clean. Go figure.


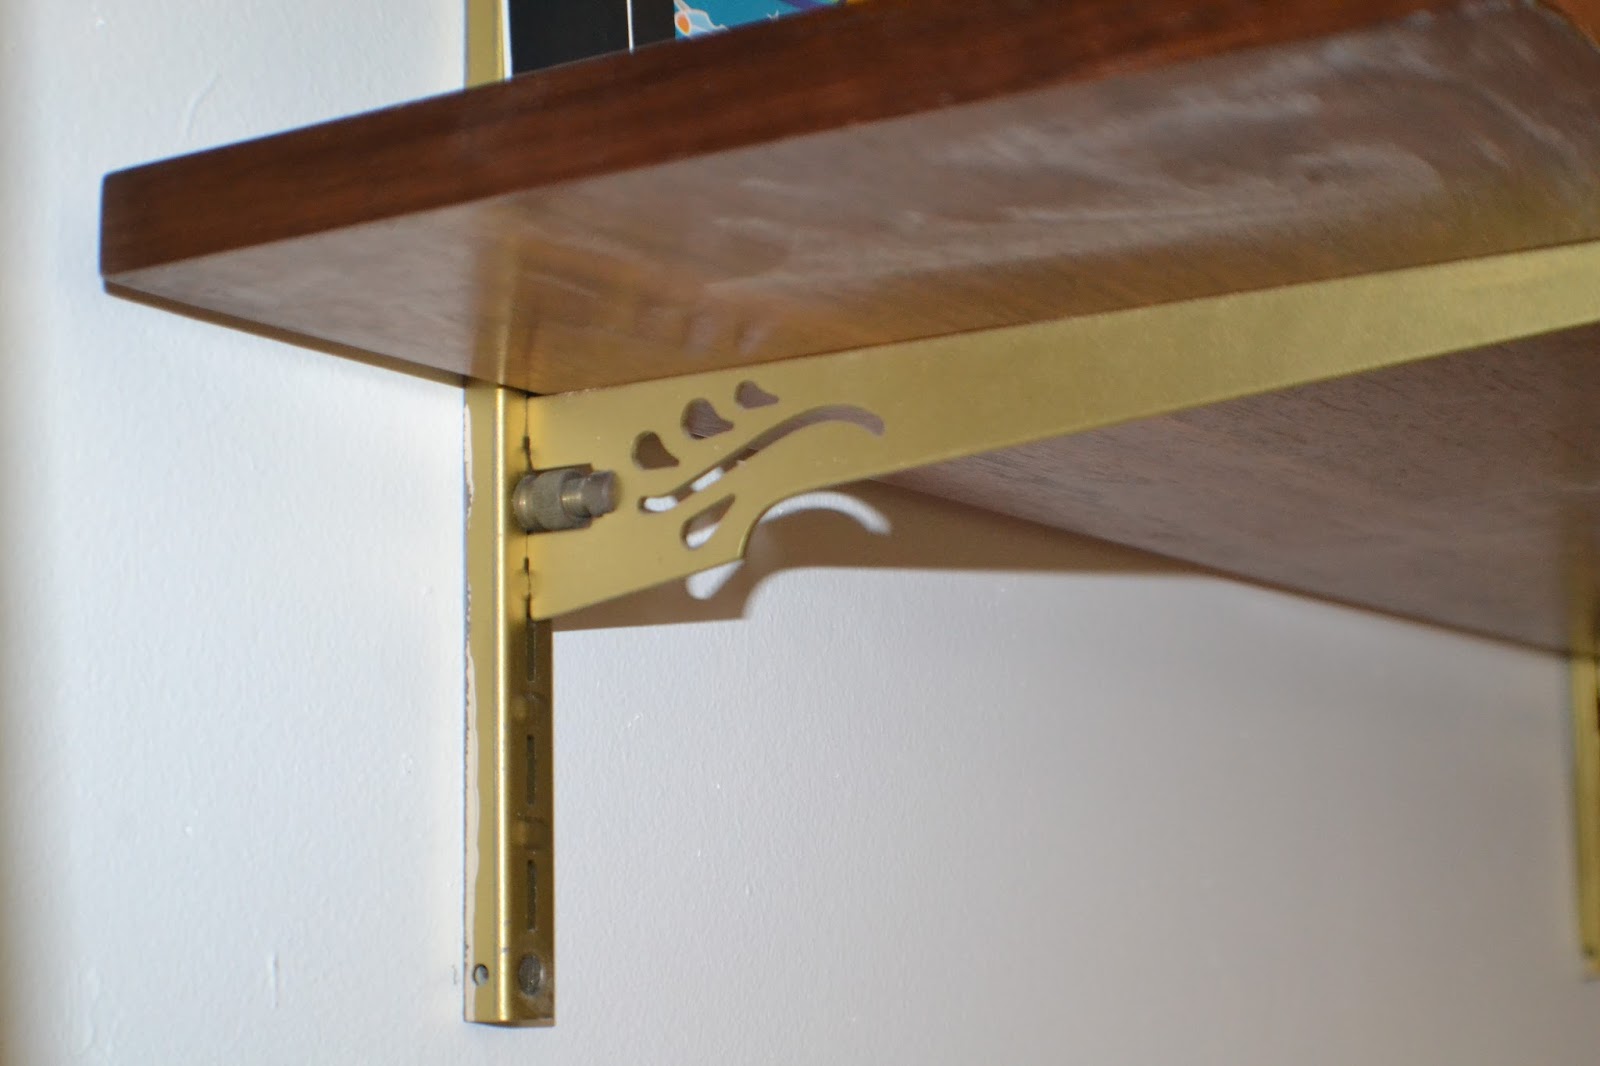
The shelving between the windows were borrowed from other rooms in the house, so they are legit vintage brass brackets.  The wood tones match the hand-me-down dressers perfectly.   The olive green blackout curtains are velvet and match the rug which was a completely happy accident. I wish they were a little bit longer (I cringe at too-short curtains) but they only came in one size. Eventually I have great plans add a strip of fabric (I'm thinking something black and white with a small pattern) to the bottom so they look longer.  For now, I'm telling myself it's a good thing the heavy fabric ends right at the radiators, so the heat isn't completely trapped behind the curtains this coming winter.


Seek adventure, William Odin!

Airplane Bed Rocket Canopy Glider Rug Curtains Owl Hamper Seek Adventure Frame

I'm so glad I participated in the One Room Challenge.  Thanks to Calling it Home for hosting this great event once again!


Week 1 Week 2 Week 3 Week 4 Week 6

Thursday, April 28, 2016

ORC: The Big Boy Room - Wallpaper & Closet! {Week 4}

So last weekend, Tom and I tackled the wallpaper wall. Cue the dramatic thunder and lighting sound effects...and then sweet birds tweeting as a rainbow emerges.

Maybe it was because I over worry, and Tom under worries, but putting up the wallpaper was surprisingly easy.  We did some mental prep work during the week, discussing our plan of attack to get the wall done in the limited hours we would have with the grandparents over.  I read and re-read this great post from Red House West about their experience putting up two sets of this particular wallpaper in Mera's play room.

The wallpaper package itself suggests starting from left to right on your wall, and drawing a plumb line about 1 inch short of the actual width of the first panel (18 inches, so we drew our plumb line at 17 inches from the corner). This is to accommodate for not so straight sheetrock corners, so that excess inch gets trimmed in place.  It also ensures your next 6 or 7 panels should be parallel going across the wall.

We knew we were only going to use about 6 and half of the 8 panels because our wall is a little smaller than the mural itself. We thought about trying to start with the middle panel, so we would have a more symmetrical mural (the trees lower in the middle and get taller on the sides), but given the good advice on the package to start left to right, and my pregnancy brain turning to complete mush lately (more on that later) I couldn't mentally deal with the math (I'm an accountant IRL. This bodes well for my co-workers my last few weeks of work).  Short story long, we did left to right.


We really found 4 of the 5 tips in the RHW post helpful, especially #1 - when it says soak for 30 seconds, they mean it.  We timed the first one (we had a plastic table out in the room and were soaking the paper in a large shallow tupperware) and about 15 seconds in, Tom and I were arguing over whether or not to wait the additional 15 seconds.  The argument went something like this: Tom "This is gooey, lets take it out" Me "No, can we follow the damn directions? Let's wait" Tom "I'm telling you Kayla, this shit is ready" Me "Fine, what do I know" (Because I'm a real defeatist like that. This is why I'm not a lawyer).

You know what, Tom was right (as usual). The paper was definitely adequately soaked.  As was our floor as we gently pulled the paper out. And it went up just fine. We had more than enough time to iron out wrinkles and shift the paper on the wall. There was a lot of goo, and we had a bag of new lint free rags ready to soak it up. We also used my 18 inch plastic fabric ruler to help smooth out bubbles and excess goo. We didn't buy any other supplies, and I'm glad we didn't waste money on it. We didn't even need the giant sponge I found in the garage.  Another tip we especially appreciated from RHW: we had extra razor blades for trimming the excess paper, and went through about 8 blades on the 7 sheets we used.


We continued this way, soaking for about 20 seconds, and putting the paper up and played around with it for about 10 minutes. We actually realized "booking" the paper wasn't working for us. I think if you had to put up paper yourself, this is probably great, but we had Tom on a stool attaching and shifting, and me crouched near the floor, holding the paper away from the wall ever so slightly so we would only attach it as Tom was ready to smooth it out.  We did the whole wall in less than two hours, with a little lunch break in between while my MIL put William down for his nap. Granted, this was a shorter wall, no windows, nothing crazy to cut around. And the print itself is VERY forgiving. But we were definitely impressed with ourselves (and petrified that within three days we would walk in and the paper would be peeling away from the wall in resentment). But I'm happy to report, a week later it still looks good!


We do have one tip of our own to offer up: When trimming the excess paper around any outlets with your box cutter - turn off the electricity!  Figured that one out the hard way (Tom, not me).


And now the closet.  When planning out the room, I was all for the monochromatic black and white look, but Tom was itching for some more color on the walls. I really wanted to keep the other three walls white, so we compromised on painting the interior of the closet. I've previously mentioned when we removed the old sliding doors, we opted not to put on new accordion doors as we did in the other rooms because we knew we would use this nook as a changing area.  The bed we purchased had some royal and navy blues in it, and we had found dark olive black out curtains for the windows.  I wanted to marry some of those colors in the closet to make it all look more purposeful.

While contemplating design, I came up with this sick MS paint rendering to send to Tom:


The light blue was meant to be some leftover paint we had from our master bath that I thought we might reuse here and the black lines depict the shelf above the dresser, the green was a sample pot we had on hand, and we knew we would have to buy the royal blue if we wanted to use it. We ended up making life easier on ourselves (or so we thought) and just buying a single gallon of the royal blue color (Deep River by Behr) and adding a single, angled stripe with the sample green (Grape Leaves by Behr).


Single, 4 inch angled stripe. How hard could that be you might ask?  Apparently VERY hard for me. I thought we would just start in one corner, tape at a slight angle, and let the tape determine the placement.  Sounded easy as I put up the top piece of tape. The bottom piece, not so much.  What started out at a 4 inch gap, turned into a 3 inch gap as I taped around the three inner walls.  So then I tried  to measure down 4 inches in a few spots and connect the dots, so to speak. Still wonky.  I could only assume the tape itself was wonky from being rolled, or our walls were not straight enough because they are old and we have found some seriously questionable construction decisions in this house.  CLEARLY, it could NOT be user error.  I spent two different lunch breaks up here (I work from home) trying to figure this out.


Thankfully, my mother happened to visiting for the week and by the third day, I enlisted her help. Remember when I said I'm a paint hog? It was time to let go.  She figured it out in a matter of minutes. (Also remember when I mentioned my pregnancy mush brain earlier?  Totally pulling that card again). Once we were satisfied with the tape, I painted inside the stripe with blue to help with bleeding, and gave it two quick coats of green. Voila! Abstract stripe.


So yeah, 2 hours to do a wall of wallpaper, and about 3 combined hours to paint a friggin' stripe in a closet.  Who knew.  So what's your favorite part?  I assumed it would be the wallpaper (which I LOVE, don't get me wrong) but this pop of color in the closet has made me surprisingly happy!  And coincidentally, one of William's cars totally matches this paint scheme. It was meant to be...


Next week - STUFF!!! Don't forget to check out the other participants.


Week 1 Week 2 Week 3 Week 4 Week 6

Thursday, April 21, 2016

ORC: The Big Boy Room - Getting Started {Week 3}

Welcome back! So in my Before post, I mentioned we had fixed a few of the annoying parts about this room. This was all PIY (pay it yourself) because we discussed and quickly decided to hire some contractors to come in for 4 days and deal with all the issues in ALL the rooms on the second floor as this could have easily taken us noobs months of weekends to complete ourselves.  And while updating molding and/or hanging doors might not sound that difficult, with a deadline like ours, we were not willing to cut our teeth on this. Sometimes it just pays to pay someone else. To recap the fixable issues in this room:
  1. Those radiators have about 10 layers of paint on them, and are constantly falling away from the wall. Hours of fun for a curious toddler.
  2. There are about 3 different types of molding in this room entire house. Some clamshell, some colonial, some walls have shoe molding, some don't. This inconsistency is quite consistent throughout our house, by the way. Drives. Me. Insane.
  3. And that doorway is in the left corner of the room (basically where the photo is taken from), however, the door opens TO THE RIGHT. Whyyyyyyyy.
  4. The ceiling boob light is about 11 inches to the right of the center of the ceiling. I repeat. Whyyyyyyyyy.
Prime example of the inconsistency in molding hanging out in the middle of our hallway.  Some shoe, some not, some non-molding patchwork, as you do apparently.
The contractors removed all the molding around the floor, windows and doors and installed simple colonial with shoe molding.  We have consistency! (PS we had already done this in most rooms on the first floor with initial construction when we bought the house).  They also added new pre-hung doors so all of our doors actually shut now (great for guests that don't appreciate when our fat tabby cat pushes into their room to join them on the bed at night).  They hung 11 doors and two sets of accordion closet doors (major upgrade to reaching into the closets over the old sliding doors). We decided against rehanging closet doors in this room, and you'll see why soon enough. They switched the swing of the doors on a few rooms and closets as well - so things are feeling much more feng shui. 

We also had an electrician come in and center the boob light on the ceiling of this room, as well as move the light switch farther down the wall of the closet because the door to this room swings to the left now, and the old switch is behind the door.  This ended up being a step we really didn't need to take and pay for, and I'll explain why in a future post (cliffhanger!).  

Last but not least - we have new radiator covers throughout the house!  I feel much better about the lack of probable lead paint that was chipping off every time a section fell off the wall when William decided to touch it. 

We did not pay the contractors to do any touchups - so we have a LOT of caulking and painting to do. We even have to touch up the walls with spackle and whatever color paint was in the room around all of the radiators because the old ones were absurdly high and now crappy sheetrock is exposed. But the focus has been to get through all of those tasks in the Big Boy Room before we move onto the other rooms.  Breathe, Kayla, breathe.  At least the construction aspect was done in 4 days by someone else. #worthit


So first things first - we caulked and painted the molding. We are pretty brand loyal to Behr paint products due to the fact that we haven't had any issues, usually can find a color we like made by them, and sheer convenience (Home Depot is about 8 minutes away).  I actually don't get crazy with all the different 'whites' out there, and we used their off-the-shelf Ultra Pure White semi gloss for all the molding and doors.  Next, we painted three of the walls and the ceiling with their off-the-shelf Ultra Pure White flat interior paint.  Easy peasy.  What is nice is that these products are all low odor and no VOC so this preggo can do the most of the painting (I find painting seriously relaxing, even if it takes me double the time to do it than it would take Tom. Anyone else hog all the painting for themselves?).  I kinda insisted on being the lead painter while Tom (and his father) continued with caulking in other rooms.  Even though completely this room is the priority, it all has to get done eventually, right?


I suck at white balance. 
The men did prep the statement wall with wallpaper primer as suggested by the wallpapering instructions. I wrongfully assumed the primer would actually be white, so I'm glad I did at least a little cutting in with the regular white paint before this went up. The primer is actually a milky color in the can (and stinky, so I took this opportunity to put my feet up downstairs on the couch) and dried fairly clear.  Though fully dried after 1 hour, its stays slightly tacky, and is allegedly going to help with adhering the wallpaper, as well as making this wallpaper easier to remove down the line (only time will tell on that part). Maybe an unnecessary extra step, but given this is our first attempt at wallpapering, we wanted to go by the book for the most part.

Fun fact - see that small section unpainted on the ceiling? WE RAN OUT OF PAINT with only a  small section left. So annoying.
The last bit o' painting that had to occur is inside the closet.  We received some hand-me-down dressers from my parents, and the shorter one fits well in here, so after removing the wooden dowel that was used to hang clothes from (you know so William can't swing from it) we are going to attach a changing pad to that dresser and change William in this nook until he is out of diapers.  Since there is a lot of white and black going on in the rest of the room, we decided to do something a little more bright in here, that would also hopefully tie in the other colors in the room to make it all look more purposeful.  You can also see in this shot that the door now swings TO THE LEFT! The door is going to get some semi-gloss white but I think I'm going to wait to do all the doors & closets (13!) at once after this baby comes.

Next week: WALLPAPER & CLOSET!!!  Teaser because this molding before and after  is just too good not to show:


Don't forget to check out the other guest participants on ORC Week 3! And just for fun try and find my link (did I get up early enough to break the top 100 in the linky party? No, no I didn't.).


Week 1 Week 2 Week 3 Week 4 Week 6

Thursday, April 14, 2016

ORC: The Big Boy Room - Inspiration {Week 2}

So last week you saw the glorious 70's vibe this  big boy room was throwing out when we purchased our home just under two years ago.

We ripped up the rugs and had the floors redone before moving in. And there it sat as a catchall until last Fall when we found out we were expecting #2.

It's a small room, but rather bright, and the blank wall to the right, opposite the doorway, just seemed perfect for something in the 'statement wall' category.

I had it in my head I was going to do a 'paint by number' mural for several weeks. Something like these:

via EasterWiki
via Apartment Therapy

This last picture was something I remember seeing on a blog YEARS ago and this is only link I was able to find that sourced the photographer. Apparently this is a room for rent at a camp/retreat facility in Illinois.

Camp Wandawega

But the more I looked into it, and tried to source my own paint by number painting from Ebay (as many sites had suggested) the more I realized I was biting off more than I could chew. And admitting that is a lot for me.  Maybe if this was a first kid project, but definitely not for a mom of a toddler.

So it was back to the drawing board, so to speak. We have a mixture of an outer space/safari animal theme in the nursery (I'll show you someday, "I pomise"), so I kinda wanted to go a little woodland creature with this one.  William is not quite old enough to have a major opinion on these things, so lucky for Tom and I, we get to make all the decisions ourselves.  Tom voted for an awesome toddler bed, of the car or airplane or something else of the really cool variety, and I kept looking for wall inspiration.

Then I saw this image on CupofJo:


And I loved the simplicity of the black and white image, allowing everything else that is kid related to be in-your-face colorful, as it happens to be regardless of how much I protest.  This was a photo they found on Ebay that was blown up and made into a wallpaper. But instead of going through old pictures, it got me thinking...oh...wallpaper murals....

Maybe like this one?


The price was right, the size was right, it had decent reviews...so we purchased it from Anthropologie. Months ago, to be honest.  Yes, we thought we'd actually have this room done by Christmas, hahahahahahaahahaahahaha. But! We have made a ton of progress in the past few weekends thanks to some great grandparents that have been coming over to watch the human tornado while Tom and I work upstairs.  And this weekend, we will attempt to put this bad boy up. Wish us luck!

Week 2 of 6 of One Room Challenge in the books. Week 33 of sobriety!  What will come first, the thrilling conclusion to this bedroom makeover, or the baby!?!?  NOBODY KNOWS!!!! 


Thursday, April 7, 2016

ORC: The Big Boy Room - Before {Week 1}

I'm going to skip all the jokes I could make about taking oh, 14 months off from blogging.  I never really expected to take that long of a break, buuut...I did. I thought about posting a clip of the opening 3 seconds of Sid the Science Kid but realized how lame it is to admit that was the first thing that popped into my head as my welcome back post.  #transformationtoparentcomplete #IusedtobecoolIswear

Reasons why I stopped blogging: my baby became a toddler, I'm expecting #2 in a few short weeks, work seems to be busier than ever, you know, life in general. In short, blogging just didn't make it on the priority list anymore.

Reason why I'm making myself start again now: as mentioned above, and fairly evident in my instagram feed, baby boy #2 is coming soon. I'm 32 weeks now, and in case anyone remembers slash cares, William was born at 37 weeks. I'm told we should just be ready for anything as far as timing - this one could be earlier, could be later, no one friggin knows.  So - as my tax season winds up we are in overdrive to get William transitioned into his "Big Boy Room" and into a toddler bed ASAP.  And what better timing than to document it all and participate in the internet-famous One Room Challenge! This room is getting updated in a short period of time no matter what, so let's see if I can eek out 5 more posts on the next 5 Thursdays? Challenge, accepted.
Of course you might also recognize some of the Featured Participants as well. I'll be linking up on Thursdays (hopefully) to the Guest Participants page. Go check out the other 200+ bloggers that are joining in on the fun (or at least pretend to).  And if you landed here from the ORC main page - kudos to you for clicking through this far. I know I've gotta be one of the last thumbnails. That is dedication.

So let's look at the glorious "before" of this room. I'm going way back to the MLS listing. We bought this house back in June of 2014, and had the rugs ripped up and the floors refinished before we moved in.  After that, this room became a catchall for out grown baby junk and whatever else we didn't want to look at up until about 3 weeks ago.  Feast your eyes:


The real estate photographers get a lot of credit. I haven't seen this picture in a long time and this room doesn't look terrible, just majorly dated.  What you can't really tell from this picture is:
  1. Those radiators have about 10 layers of paint on them, and are constantly falling away from the           wall. Hours of fun for a curious toddler.
  2. There are about 3 different types of molding in this room. Some clamshell, some colonial, some walls have shoe molding, some don't. This inconsistency is quite consistent throughout our house, by the way. Drives. Me. Insane.
  3. This room is pretty small. Like 8 x 10 small. Trust me, that bed, if it were still there, is way closer to the doorway in person.
  4. And that doorway is in the left corner of the room (basically where the photo is taken from), however, the door opens TO THE RIGHT. Whyyyyyyyy.
  5. The ceiling boob light is about 11 inches to the right of the center of the ceiling. I repeat. Whyyyyyyyyy.
Good news is 1, 2, 4 and 5 are fixable to a satisfying degree for me. And, even better, they actually are now fixed.  

So come back next week to either see if I had this kid super early (dear god let me at least make it to 37 weeks again) or to see what we did next in the room.  #nailbiter

Week 1 Week 2 Week 3 Week 4 Week 6

Thursday, December 11, 2014

Mistle Toes Ornaments {Dare to DIY 2014 - Give Homemade }

Last weekend we kinda killed it with festive activities.  I found a shopping center that has all of my favorite big box stores to shop at and we knocked out all gifts on our winter wishes list from NewYorkCares.org.  We got a tree from Home Depot where we were recognized by workers (I guess we've been there a few times lately). And I finished decorating the house inside and out. If felt good to get so many tasks done since I had several days of commuting into Manhattan for meetings for work this week, and we are having a few friends over this weekend for a little holiday dinner.  And through it all, I even found time to make some handmade gifts for the grandparents. Spoiler Alert Grandmas: stop reading if you want to be surprised on Christmas morning!

I recall a few years ago a friend telling me one of the best things about having kids was that you had automatic gifts for the grandparents at every holiday - just give them something baby related and they will be happy.  So here ya go Grandmas, they aren't perfect, but they are made with baby love!


For this project you will need:


Ornaments (I found these flat-ish plastic ones at Michaels for $2.99 each)
Craft Paint (I did a little research on this - some sites said acrylic on skin isn't great in general, but tempura or washable paint would flake off of the ornament.  I did a little skin test on myself and had wet paper towels ready to clean him up within seconds of putting the paint on him. The sites that said acrylic wasn't a great idea were mostly talking about face painting where the paint would stay on for hours so I felt ok with it since it was literally on his skin for less than a minute. Do your own research to determine what you feel comfortable with. If you have tempura paint, maybe a sealant spray on top would help with flaking)
Flat Paintbrush
Paint Pens 
Wet paper towels or washcloths
Sleeping Baby
If a sleeping baby is not available, Extra Patience and Quick Hands


What was good about the acrylic paint on the plastic ornament is that it was forgiving for a few seconds.  I got two ornaments done before he woke up and then it was a little bit trickier to get a good smudge on the last ornaments so I was able to wipe the paint off and try again.  Working quickly is key here on many levels.  My kids does not like to get "got" so holding his foot was a challenge, even for a few seconds. 

I threw in some crinkle paper since the ornaments were see through, and if I get around to it, I might even tie a bow to the tops of these.  The possibilities are endless.

"Mistle Toes" was an easy play on words and great given his age and size of foot - but I'm really looking forward to making these cute finger snowmen in a few years when he is a bit bigger, which is the project that was my original inspiration and got the ol' gears turning.

I'm linking up on Maybe Matilda today!  Go check out the fun!


So what was the over/under for me coming back and joining in a second linky party?? Will I make it to the final party??? Don't fall off the edge of your seats, people.

Tuesday, December 2, 2014

Christmas Tree Napkins {or Dare to DIY 2014 - Entertain! Edition)

I've followed the Dare to DIY link parties for a few years. Last year I actually pulled myself away from the toilet (morning sickness lasts all day for some) long enough to make these painted cork placemats.  It was fun.

So I told myself last year I would join in at least two of the link parties this year.  Baby steps people, blogging on a regular basis is not my thing.  And when you are staring at primered walls, that you told yourself you would get painted by Thanksgiving, and there is an adorable 4 month old that is figuring out how to bring his tiny thumbs to his mouth, it's kinda hard to justify to yourself to sit and get crafty.  But I saw this video on FB and was reminded of how much I actually enjoyed the task of folding cloth napkins. I was a waitress at two different family owned resorts growing up, and I actually loved the task of folding napkins for dinner. I still find myself refolding cloth napkins when I'm at restaurants if their fold job isn't up to my standards. #formerwaitressproblems


So I thought, oh I'll go find some vintage tablecloths and make my own festive napkins for some dinner parties we are hosting in the coming weeks. Then I remembered I have no idea where to get vintage anything in my new town.  Seriously, WHERE ARE THE FLEA MARKETS AROUND HERE???  I found one antique shop that takes itself waaay too seriously with the pricing.  Someone, someone, tell me where I can find cheap used junk to make glorious again in central New Jersey please.

So then I thought, ok, I'll skip this link party. And then I thought, NO KAYLA JUST FOLD YOUR WHITE NAPKINS.  True, I didn't lug out the paint, the orbital sander, or the sewing machine for this project. I didn't even lug out the iron, and really, I should have at least done that.  But whatever. I still like them.

Feast for your eyes, people:


Can I make a table look sexy or what?


Blogger confession: I bought washi tape for the first time. I used it to make little place tag flags attached to little ornaments from the dollar store. Little woodland critters sent down by my mother and Boom. Tablescape is done, ya'll.


I'm still searching for that perfect vintage holiday tablecloth and napkin set.  But for now I still dig this burgandy/gold/aqua number.  It really pulls in the gold and aqua from around the room. The room that I'm not ready to show you until it's a little more "done". You know, like more than just primered (it's a real word, trust).  But I did put up some pre-lit garland!


I'll only gush about that chandelier for a minute - but it's literally the first thing we bought after we bought the  house. It is hands down my favorite piece we added. Tom knew a lighting guy and we got it for a steal which was the only way we were actually going to get that thing into our house. I'll give you a real breakdown of the dining room/living room/kitchen soon enough (translation: before the end of 2015).


Kitchen teaser. Yup, that's an antique rug from ebay in my kitchen. I'm so en trend. And that is my Stokke Steps high chair.  Hands down, best money we spent on a single baby item (even though its really like 4 items).  I love that thing and so does the little one.

And here's that napkin folding video. Looks like there a couple versions on youtube, but this is the one that gave me the idea in the first place:


And if you are here from Decor and the Dog - welcome!  If not, check out the other party animals here to see what everyone came up with! Will I meet my personal goal and come back for a second link party in the next two weeks? ONLY TIME WILL TELL.